RACE DDU · THE PILOT'S MANUAL
This page has two parts. Part 1 is the one-minute overview — read it before your first session. Part 2 is the full, detailed reference — every LED, every panel, every widget, every menu — written for a pilot, not a developer. Come back to it whenever you want to get more out of the app.
PART 1 · OVERVIEW
RACE DDU watches your live iRacing telemetry and compares it, corner by corner, against a reference lap — a clean lap of yours, a teammate's, or a Garage 61 export. As you approach each braking point it counts down 3 · 2 · 1 on five small lights, so you always know a braking point is coming — even on a track you've never driven — without hunting for a board or a kerb.
It starts as a bar small enough to forget about, and grows into exactly as much dashboard as you want — never more.
01
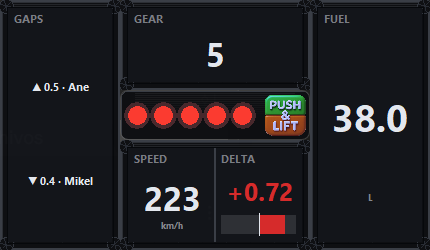
Five LEDs die left-to-right over the 3 seconds before each braking point. Their colour tells you how hard that corner brakes before you even get there.
02
It lights up the moment the app is reading your session, and dims while it waits — one glance tells you it's alive.
03
Drag it from the middle to move it anywhere on screen. Drag any corner or edge to reshape it — width and height, completely independent.
04
Snap extra screens above, below, left or right of the bar. Split each into as many cells as you like and fill them from a catalogue of 101 widgets.
05
Nothing is pre-loaded. Every braking point comes from a reference lap you supply — your own, a teammate's, or one you record inside the app in seconds.
06
Runs borderless and shows up in the taskbar, so Meta Quest Link can pin it — no window frame floating in your headset.
Load a Garage 61 CSV, or just drive one clean lap and hit record — either works.
Join your session. The five LEDs start counting down before your very first braking point.
Right-click → Screens, dock one where you like, and fill it with whatever data matters to you.
That's the whole idea. Everything below is the same app explained in full — read on whenever you want the fine detail on any part of it.
Ten sections, in the order you'll actually use them: getting a reference lap, reading the bar, docking screens, editing what's inside them, the full widget catalogue, personalizing each cell, the complete menu, VR, languages, and what gets remembered between sessions.
01 · THE REFERENCE LAP
RACE DDU has no braking points memorised for any car or track. Every single countdown, every colour, comes from comparing your live position on track against a reference lap you provide. Think of the reference lap as the "answer key": one clean, complete lap that shows exactly where the throttle lifts and the brake goes down, corner by corner. Once it's loaded, the app knows where every braking point is — on any car, any track — because it read it from that lap, not from a database.
You can get a reference lap three ways:
What the CSV needs: at minimum, a Throttle column and a Brake column (0–1 or 0–100, either works). If the file also has a distance column — LapDistPct, "Distance", or similar — the alignment between your live position and the reference is pixel-perfect. Without one, the app falls back to aligning by time, which still works but is slightly less precise on laps with very different pace. Garage 61 exports and iRacing's own telemetry always include this column, so this only matters if you're building a CSV by hand from another source.
One clean lap is enough — don't overthink it. It doesn't need to be your fastest, just representative: normal braking points, no spins, no pitting mid-lap. You can always load a better one later; it replaces the old one instantly, live.
02 · READING THE BASE BAR
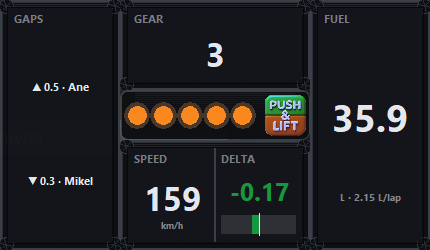
The five dots start lighting up, left to right, 3 seconds before the reference lap's braking or lift point for the corner you're approaching. At normal speed that's roughly one dot every 0.6 seconds. They then die off the same way, left to right, and the last one goes dark exactly on the ideal point — not a fraction early, not late. That's your cue to be on the brake.
The colour of the dots tells you, before you even reach the corner, how hard the reference lap brakes there:
That's it for the countdown — no big "BRAKE" banner, no numbers fighting for your attention. Five dots and a colour, read with the edge of your vision while you keep your eyes on the apex.
The Push & Lift button on the right of the bar is a quiet status light: it's at full brightness whenever the app is reading a live session (iRacing or the demo feed), and dims while it's waiting for one. A glance tells you the app is actually alive without reading any text.
Moving it: click and drag anywhere on the middle of the bar — away from its edges —
and it follows your mouse. Any docked screens move with it.
Resizing it: hover any corner or edge until the cursor changes, then drag. Unlike a
normal window, width and height resize independently — you can make it a short wide
strip, a small square, or a tall thin column, whatever fits your wheel, monitor or headset
best.
03 · DOCKING SCREENS
A docked screen is an extra panel that snaps flush to one side of the base bar — top, bottom, left or right. You can have up to four at once, and each is completely independent: its own layout, its own widgets, its own size.
Turning one on: right-click the bar (or any docked screen) → Screens → pick Top, Bottom, Left or Right. It appears immediately, attached to that side. Pick the same option again to hide it — it disappears, but remembers its layout for next time.
Docked screens always follow the base bar: move the bar and every open screen moves with it, keeping the whole thing glued together as one dashboard.
Resizing a docked screen's thickness: hover its outer edge — the side facing away from the base bar — until the cursor changes to a resize arrow, then drag. That changes how much space that panel takes without touching its width along the bar. You can also nudge it in fixed steps with the size − / size + buttons that appear in edit mode.
04 · EDITING WHAT'S INSIDE
Each docked screen is a blank canvas you divide into as many cells as you want, then fill each one with a function. To start arranging, turn on Edit mode: right-click → Edit mode, or just press E. Every cell now shows four small buttons in its corner, and clicking its body lets you assign it a function.
Exact grid: the number in the middle of the edit toolbar shows how many cells the screen currently has. Click it to type an exact number from 1 to 50 — the screen rearranges into a clean, even grid, and keeps whatever you already had in each cell.
Proportions: once you have more than one cell, a line appears between them. Drag that line to make one cell bigger and its neighbour smaller — useful for giving more room to a graph or a bigger number.
Turn Edit mode back off before you go on track: it hides all these buttons and lines, so nothing is left to bump by accident mid-session.
05 · THE WIDGET CATALOGUE
Click any empty (or filled) cell body to open the picker: a search box at the top, and category tabs down the left — CSV-DDU, PL Relatives, Race, Fuel and Tires, Clima, Mixed Car Inputs, Single Car Inputs, Car Info, and Others. It opens straight on the cell's current category, and whatever is already assigned there is highlighted in green so you never lose track of it. Type in the search box to filter by name or description across every category at once. The name in parentheses on each cell is always in technical English — racing's universal language.
Picking ∅ Empty at the top of the list clears a cell — handy while you're still arranging a layout.
06 · PERSONALIZING EACH CELL
Click the gear icon on any cell (in Edit mode) to open its settings:
07 · MENU REFERENCE
08 · VR & META QUEST LINK
In its default borderless overlay mode, RACE DDU has no title bar or frame, but it still registers as a normal application in the Windows taskbar and Alt-Tab. That's on purpose: it means Meta Quest Link's app-pinning feature can find it and pin it into your headset like any other desktop window — clean, no frame floating in your field of view.
If your particular headset software doesn't list the overlay for pinning, switch to Titled window (VR) in the menu: it puts a normal window border and title bar back on, which every pinning tool recognises, as a guaranteed fallback.
09 · LANGUAGES
English, Spanish, German, French, Italian and Chinese — every menu, every popup and the in-app manual switch instantly from Language in the right-click menu. Your choice is remembered the next time you open the app.
10 · SAVING & MEMORY
Position, size and shape of the base bar, which screens are docked and how they're split, every widget and colour you chose, your reference lap, opacity, always-on-top, VR mode and language — all of it is remembered automatically next to the program, with nothing to configure or back up by hand. Close the app mid-session and reopen it later: everything is exactly where you left it.
↑ Back to the top